About the ServoyUpdater
The goal of the ServoyUpdater is to allow a Servoy server to update solutions by itself by downloading new releases from an FTP server. The relevant settings for the update are supplied in a properties file for each solution. The plugin offers a convenient method to create such a properties file.
How it works
Configuring FTP settings
The plugin needs to know what FTP server to connect to. To specify that, you can either enter these settings in servoy-admin/plugin-settings or provide these settings in a special servoyUpdater.properties file. Currently, the following properties can be set:
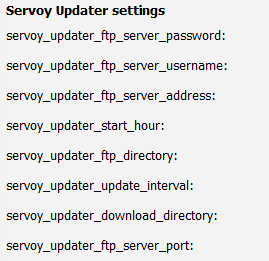
servoy_updater_ftp_server_address: the ftp server address
servoy_updater_ftp_server_port: the ftp server port (defaults to 21)
servoy_updater_ftp_server_username: the user name
servoy_updater_ftp_server_password: the password
servoy_updater_ftp_directory: an optional directory on the ftp server
servoy_updater_download_directory: the download directory used (if nothing is provided, a servoyUpdater directory in application_server is created and used)
servoy_updater_update_interval: the interval in milliseconds in which the updater checks the ftp server for new updates (usually one day should be fine - 1000*60*60*24 milliseconds)
servoy_updater_start_hour: the hour on which the interval starts
server_updater_server_identifier: a unique name for each server that you can set; if set, this name will be used to name the directory to which results are uploaded
A typical setting could be servoy_updater_start_hour=3 and servoy_updater_update_interval=86400000 for a check every day at 3 o'clock.
Providing a new update
To provide a new update simply upload the new .servoy file to the FTP server along with a .properties file with the settings for the update. The create these settings, the plugin also features a client plugin that allows you to easily create these settings:
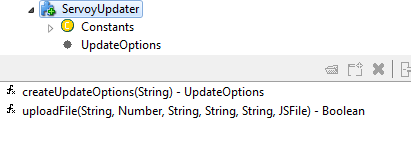
The method plugins.ServoyUpdater.uploadFile() can be used to upload a file to a FTP server. To create the settings for an update, use the method plugins.ServoyUpdater.createUpdateOptions(). It will return a UpdateOptions object that has these properties:
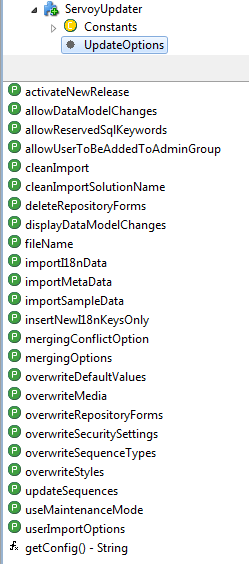
Set the relevant settings and call getConfig() to get the content of the needed properties file as a String. These properties can then be written to a text file that has to be uploaded to the ftp server along with the solution.
The name of the properties file has to be the same as the solution. If you provide a solution mySolution_2012_08_01.servoy, you also need to provide the properties as mySolution_2012_08_01.properties.
Use the sample solution to create an update
The sample solution provided with the plugin allows you to configure an update just as you would in the "Import solution" page on servoy-admin, create the properties file and upload both to the FTP server.
How the ServoyUpdater plugin applies an update
Whenever the servoy server is started, it also starts the ServoyUpdater server plugin. The plugin will read the FTP configuration settings either from servoy.properties (if entered through servoy-admin) or its own properties file. It will schedule a check on the FTP server for the given interval, starting from the optional start hour. If no hour is provided, it will perform the first check after the first interval has passed.
When checking the ftp server, the plugin will look at all .servoy files on the FTP server and compare them by name, date and size with the ones it has downloaded before. If an update is found that differs in name, size and date it will download that file along with the .properties file.
After the successful download, the plugin will apply the downloaded update using the settings provided in the .properties file. If the update has been successfully uploaded, the plugin will store the name, size, date and update result html in its properties file. The update result HTML will then be uploaded to the FTP server in a subdirectory "applied_updates/servoy_license_key" that the plugin will create if not yet present. For each Servoy server you have a directory with the license key of the specific server as directory name is created for the results. If you want to use a custom name for each server independently from the license key, you can enter a name in the property servoy_updater_server_identifier. If neither a name nor a license key is present, the plugin will generate a UUID for each server and use that as server identifier.